Integrating existing Flutter packages into your Flet app
The guide is being updated.
Introduction
While Flet controls leverage many built-in Flutter widgets, enabling the creation of even complex applications, not all Flutter widgets or third-party packages can be directly supported by the Flet team or included within the core Flet framework.
To address this, the Flet framework provides an extensibility mechanism. This allows you to incorporate widgets and APIs from your own custom Flutter packages or third-party libraries directly into your Flet application.
Prerequisites
To integrate custom Flutter package into Flet you need to have basic understanding of how to create Flutter apps and packages in Dart language and have Flutter development environment configured. See Flutter Getting Started for more information about Flutter and Dart.
Creating Flet extension
Flet extension that integrates 3rd-party Flutter package consists of the following parts:
-
Flet Dart package.
-
Flet Python control.
The Flet Dart package includes a mechanism to create Flutter widgets based on control names returned by the Control's _get_control_name() function. This mechanism iterates through all third-party packages and returns the first matching widget.
Flet Python control is a Python class that you will use in your Flet program.
For example, take a look at a basic Flet extension for flutter_spinkit package.
Flet Dart package
To create a new Dart package, run the following command:
flutter create --template=package <package_name>
You will see this folder structure:
├── CHANGELOG.md
├── LICENSE
├── README.md
├── analysis_options.yaml
├── lib
│   └── <package_name>.dart
├── pubspec.lock
├── pubspec.yaml
├── test
│   └── <package_name>_test.dart
└── <package_name>.iml
In the lib folder, you need to create src folder with two files: create_control.dart and <control_name>.dart:
└── <package_name>
    ├── lib
    │   ├── <package_name>.dart
    │   └── src
    │       ├── create_control.dart
    │       └── <control_name>.dart
    └── pubspec.yaml
pubspec.yaml
A yaml file containing metadata that specifies the package's dependencies.
In your pubspec.yaml you should add dependency to flet and Flutter package for which you are creating your extension.
In the Flet Spinkit example, pubspec.yaml contains dependency to flutter_spinkit:
dependencies:
  flet: ^0.22.0
  flutter_spinkit: ^5.2.1
<package_name>.dart
Extension package should export two methods:
createControl- called to create a widget that corresponds to a control on Python side.ensureInitialized- called once on Flet program start.
library <package_name>;

export "../src/create_control.dart" show createControl, ensureInitialized;
create_control.dart
Flet calls createControl for all controls and returns the first matching widget.
import 'package:flet/flet.dart';

import 'spinkit.dart';

CreateControlFactory createControl = (CreateControlArgs args) {
  switch (args.control.type) {
    case "spinkit":
      return SpinkitControl(
        parent: args.parent,
        control: args.control,
      );
    default:
      return null;
  }
};

void ensureInitialized() {
  // nothing to initialize
}
<control-name>.dart
Here you create Flutter "wrapper" widget that will build Flutter widget or API that you want to use in your Flet app.
Wrapper widget passes the state of Python control down to a Flutter widget, that will be displayed on a page, and provides an API to route events from Flutter widget back to Python control.
import 'package:flutter/material.dart';
import 'package:flutter_spinkit/flutter_spinkit.dart';

class SpinkitControl extends StatelessWidget {
  const SpinkitControl({
    super.key,
  });

  @override
  Widget build(BuildContext context) {
    return const SpinKitRotatingCircle(
      color: Colors.red,
      size: 100.0,
    );
  }
}
As a proof of concept, we would like to see the hardcoded SpinKitRotatingCircle in our Flet program, and later we will get to customizing its properties.
Flet Python control
Flet Python control is a Python class that you can create in your Flet app or as an external Python module. In the Flet Spinkit example, we created Spinkit class in /controls/spinkit.py file:
from flet_core.control import Control


class Spinkit(Control):
    """
    Spinkit Control.
    """

    def __init__(self):
        Control.__init__(self)

    def _get_control_name(self):
        return "spinkit"
The minumal requirements for this class is that it has to be inherited from Flet Control and it has to
have _get_control_name method that will return the control name. This name should be the same as args.control.type
we check in the create_control.dart file.
Connect your Python app and Dart package
Once you have created Flet Dart package and Flet Python control, create a Python program in main.py that uses it:
import flet as ft
from controls.spinkit import Spinkit

def main(page: ft.Page):
    page.vertical_alignment = ft.MainAxisAlignment.CENTER
    page.horizontal_alignment = ft.CrossAxisAlignment.CENTER

    page.add(Spinkit())


ft.app(main)
Let's run this simple app with flet run command. We expect to see the hardcoded SpinKitRotatingCircle on the page but that's not happening yet. Instead, we see this message in place of the Spinkit control:
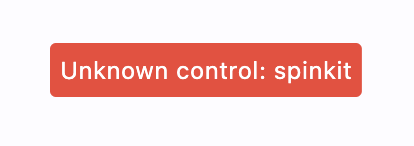
Our Flet app doesn't know yet about the new Flet Dart package that we created.
To connect your Python app and new Flet Dart package, you need create to pubspec.yaml file on the same level as main.py. It should have the following contents:
dependencies:
  flet_spinkit:
    path: {absolute-path-to-flet-dart-package-folder}
This approach is subject to change and the guide is being updated.
Now you need to build the app for the platform of your choice by running flet build command, for example:
flet build macos
Finally, we open the built app:
open build/macos/flet_spinkit_app.app

You can find source code for this example here.
Every time you need to make changes to Python or Dart part of your extension, you need to re-run build command.
Customize properties
In the example above, Spinkit control creates a hardcoded Flutter widget. Now let's customize its properties.
Flet Control properties
When we created Spinkit class in Python, it inherited from Flet Control class that has properties common for all controls such as visible, opacity and tooltip, to name a few. See reference for the common Control properties here.
To be able to use these properties for your new control you need to add the Control properties you want to use in the constructor for your new Python control:
from typing import Any, Optional

from flet_core.control import Control, OptionalNumber

class Spinkit(Control):
    """
    Spinkit Control.
    """

    def __init__(
        self,
        #
        # Control
        #
        opacity: OptionalNumber = None,
        tooltip: Optional[str] = None,
        visible: Optional[bool] = None,
        data: Any = None,
    ):
        Control.__init__(
            self,
            tooltip=tooltip,
            opacity=opacity,
            visible=visible,
            data=data,
        )

    def _get_control_name(self):
        return "spinkit"
In <control-name>.dart file, wrap your widget into baseControl() to magically implement all Python's Control properties:
import 'package:flet/flet.dart';
import 'package:flutter/material.dart';
import 'package:flutter_spinkit/flutter_spinkit.dart';

class SpinkitControl extends StatelessWidget {
  final Control? parent;
  final Control control;

  const SpinkitControl({
    super.key,
    required this.parent,
    required this.control,
  });

  @override
  Widget build(BuildContext context) {
    return baseControl(
        context,
        const SpinKitRotatingCircle(
          color: Colors.green,
          size: 100.0,
        ),
        parent,
        control);
  }
}
Finally, use Control properties in your app:
import flet as ft
from controls.spinkit import Spinkit


def main(page: ft.Page):
    page.vertical_alignment = ft.MainAxisAlignment.CENTER
    page.horizontal_alignment = ft.CrossAxisAlignment.CENTER

    page.add(Spinkit(opacity=0.5, tooltip="Spinkit tooltip"))


ft.app(main)
You can find source code for this example here.
Flet ConstrainedControl properties
Generally, there are three types of controls in Flet:
- Visual Controls that are added to the app/page surface, such as Spinkit.
- Popup Controls (dialogs, pickers, panels etc.).
- Non-visual Controls or services that are added to
overlay, such as Video or Audio.
In the most cases, Visual Controls could inherit from ConstrainedControl that has many additional properties such as top and left for its position within Stack and a bunch of animation properties.
To use those properties, inherit your control from CostrainedControl and add those properties to the constructor of
your Python control:
from typing import Any, Optional

from flet_core.constrained_control import ConstrainedControl
from flet_core.control import OptionalNumber


class Spinkit(ConstrainedControl):
    """
    Spinkit Control.
    """

    def __init__(
        self,
        #
        # Control
        #
        opacity: OptionalNumber = None,
        tooltip: Optional[str] = None,
        visible: Optional[bool] = None,
        data: Any = None,
        #
        # ConstrainedControl
        #
        left: OptionalNumber = None,
        top: OptionalNumber = None,
        right: OptionalNumber = None,
        bottom: OptionalNumber = None,
    ):
        ConstrainedControl.__init__(
            self,
            tooltip=tooltip,
            opacity=opacity,
            visible=visible,
            data=data,
            left=left,
            top=top,
            right=right,
            bottom=bottom,
        )

    def _get_control_name(self):
        return "spinkit"
In <control-name>.dart file, use constrainedControl method to wrap Flutter widget:
import 'package:flet/flet.dart';
import 'package:flutter/material.dart';
import 'package:flutter_spinkit/flutter_spinkit.dart';

class SpinkitControl extends StatelessWidget {
  final Control? parent;
  final Control control;

  const SpinkitControl({
    super.key,
    required this.parent,
    required this.control,
  });

  @override
  Widget build(BuildContext context) {
    return constrainedControl(
        context,
        const SpinKitRotatingCircle(
          color: Colors.green,
          size: 100.0,
        ),
        parent,
        control);
  }
}
Use ConstrainedControl properties in your app:
import flet as ft
from controls.spinkit import Spinkit


def main(page: ft.Page):
    page.vertical_alignment = ft.MainAxisAlignment.CENTER
    page.horizontal_alignment = ft.CrossAxisAlignment.CENTER

    page.add(
        ft.Stack(
            [
                ft.Container(height=200, width=200, bgcolor=ft.colors.BLUE_100),
                Spinkit(opacity=0.5, tooltip="Spinkit tooltip", top=0, left=0),
            ]
        )
    )


ft.app(main)
You can find source code for this example here.
Control-specific properties
Now that you have taken full advantage of the properties Flet Control and ConstrainedControl offer, let's define the properties that are specific to the new Control you are building.
In the Spinkit example, let's define its color and size.
In Python class, define new color and size properties:
from typing import Any, Optional

from flet_core.constrained_control import ConstrainedControl
from flet_core.control import OptionalNumber


class Spinkit(ConstrainedControl):
    """
    Spinkit Control.
    """

    def __init__(
        self,
        #
        # Control
        #
        opacity: OptionalNumber = None,
        tooltip: Optional[str] = None,
        visible: Optional[bool] = None,
        data: Any = None,
        #
        # ConstrainedControl
        #
        left: OptionalNumber = None,
        top: OptionalNumber = None,
        right: OptionalNumber = None,
        bottom: OptionalNumber = None,
        #
        # Spinkit specific
        #
        color: Optional[str] = None,
        size: OptionalNumber = None,
    ):
        ConstrainedControl.__init__(
            self,
            tooltip=tooltip,
            opacity=opacity,
            visible=visible,
            data=data,
            left=left,
            top=top,
            right=right,
            bottom=bottom,
        )

        self.color = color
        self.size = size

    def _get_control_name(self):
        return "spinkit"

    # color
    @property
    def color(self):
        return self._get_attr("color")

    @color.setter
    def color(self, value):
        self._set_attr("color", value)

    # size
    @property
    def size(self):
        return self._get_attr("size")

    @size.setter
    def size(self, value):
        self._set_attr("size", value)
In <control-name>.dart file, use helper methods attrColor and attrDouble to access color and size values:
import 'package:flet/flet.dart';
import 'package:flutter/material.dart';
import 'package:flutter_spinkit/flutter_spinkit.dart';

class SpinkitControl extends StatelessWidget {
  final Control? parent;
  final Control control;

  const SpinkitControl({
    super.key,
    required this.parent,
    required this.control,
  });

  @override
  Widget build(BuildContext context) {
    var color = control.attrColor("color", context);
    var size = control.attrDouble("size");

    return constrainedControl(
        context,
        SpinKitRotatingCircle(
          color: color,
          size: size ?? 50,
        ),
        parent,
        control);
  }
}
Use color and size properties in your app:
import flet as ft
from controls.spinkit import Spinkit


def main(page: ft.Page):
    page.vertical_alignment = ft.MainAxisAlignment.CENTER
    page.horizontal_alignment = ft.CrossAxisAlignment.CENTER

    page.add(
        ft.Stack(
            [
                ft.Container(height=200, width=200, bgcolor=ft.colors.BLUE_100),
                Spinkit(
                    opacity=0.5,
                    tooltip="Spinkit tooltip",
                    top=0,
                    left=0,
                    color=ft.colors.PURPLE,
                    size=150,
                ),
            ]
        )
    )

ft.app(main)
You can find source code for this example here.
Examples for different types of properties and events
Enum properties
For example, clip_behaviour for AppBar.
In Python:
# clip_behavior
@property
def clip_behavior(self) -> Optional[ClipBehavior]:
    return self._get_attr("clipBehavior")

@clip_behavior.setter
def clip_behavior(self, value: Optional[ClipBehavior]):
    self._set_attr(
        "clipBehavior",
        value.value if isinstance(value, ClipBehavior) else value,
    )
In Dart:
var clipBehavior = Clip.values.firstWhere(
    (e) =>
        e.name.toLowerCase() ==
        widget.control.attrString("clipBehavior", "")!.toLowerCase(),
    orElse: () => Clip.none);
Json properties
For example, shape property for Card.
In Python:
def before_update(self):
    super().before_update()
    self._set_attr_json("shape", self.__shape)

# shape
@property
def shape(self) -> Optional[OutlinedBorder]:
    return self.__shape

@shape.setter
def shape(self, value: Optional[OutlinedBorder]):
    self.__shape = value
In Dart:
var shape = parseOutlinedBorder(control, "shape")
Children
For example, content for AlertDialog:
In Python:
    def _get_children(self):
        children = []
        if self.__content:
            self.__content._set_attr_internal("n", "content")
            children.append(self.__content)
        return children
In Dart:
    var contentCtrls =
        widget.children.where((c) => c.name == "content" && c.isVisible);
Events
For example, on_click event for ElevatedButton.
In Python:
# on_click
@property
def on_click(self):
    return self._get_event_handler("click")

@on_click.setter
def on_click(self, handler):
    self._add_event_handler("click", handler)
In Dart:
Function()? onPressed = !disabled
    ? () {
        debugPrint("Button ${widget.control.id} clicked!");
        if (url != "") {
        openWebBrowser(url,
            webWindowName: widget.control.attrString("urlTarget"));
        }
        widget.backend.triggerControlEvent(widget.control.id, "click");
    }
    : null;
Examples
A few Flet controls are implemented as in external packages and could serve as a starting point for your own controls:
Video- Python control, Flutter packageAudio- Python control, Flutter packageRive- Python control, Flutter package